It's been a while since I last posted but that doesn't mean progress has not been made on the dune buggy. I've done quite a bit. Let's see.....I have the buggy torn all apart. I now have new axles and bearings. Had to get the axles drilled for Chevy 5 x 4.75" pattern wheels....and the drums too. That's all done and painted. Same with the brake backing plates. Turns out everything was mismatched before so I had 61 and 63 axles and backing plates which were different. All matches now.
I spent about a week cleaning the oil cooler so black chunks finally stopped coming out of it. The front brakes are all back together. The steering column is out and got blasted and painted. I've got a new bearing to put in it and will add a stock VW turn signal. My buggy didn't have one. I put the shroud sheet metal on the front and back of the motor and installed a new fan bearing and chrome fan pulley.
The carbs soaked for a few days in cleaner and are now ready for a rebuild. New fuel lines and a pump are on the way. I'm going to ditch the electric pump. Took the VW seat frames out and cleaned them up. I may modify them to lower the seats a bit. Also cleaned the floor and took care of the surface rust. Have a few holes that need filling.....someone drilled a few too many holes.
Slowing down a bit now because I need to repair the clutch tube and also the section of the admiral's hat they cut in to. Have all the parts to do that and also the shift bushing I just need to have my buddy bring the welder back. Once that is done we'll install the Rebel harness and start putting the back suspension pieces back on. All have been blasted and cleaned. Also have a set of Big Boy pedals to install.
Bounty Hunter resurrection and build thread
Re: Bounty Hunter resurrection and build thread
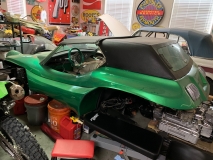
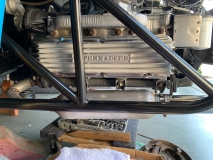
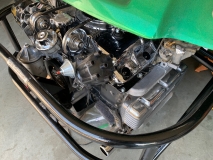
So where were we?? I've done a lot since my last post. Gone is the 98/102 hp motor that was in there before. I yanked it and installed a healthy 1965 110hp motor and transmission. It doesn't smoke and has good compression.
The old motor is out and the 110 is in.
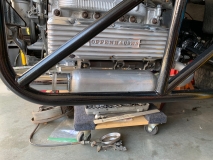
This was the exhaust that came with my 110. It sounded pretty good so I'll use this temporarily.
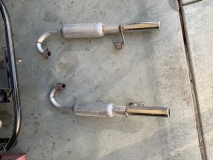
The space between the Transvair cage doesn't leave a whole lot of room for the exhaust.
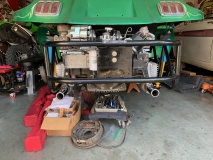
I reversed the muffler to get an idea of what the center to center measurement needs to be for the ubend. I ended up with 3.5"
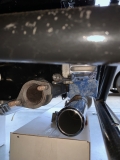
Put a box under to see what the height looked like. These are 3.5" x 12" glasspacks but I've got a set of 3" that will go on later.

This is what it looks like all done. The mufflers are at the same height although it doesn't look it in the picture.
The old motor is out and the 110 is in.
This was the exhaust that came with my 110. It sounded pretty good so I'll use this temporarily.
The space between the Transvair cage doesn't leave a whole lot of room for the exhaust.
I reversed the muffler to get an idea of what the center to center measurement needs to be for the ubend. I ended up with 3.5"
Put a box under to see what the height looked like. These are 3.5" x 12" glasspacks but I've got a set of 3" that will go on later.
This is what it looks like all done. The mufflers are at the same height although it doesn't look it in the picture.
Last edited by dlyle on Fri Jul 24, 2020 5:56 am, edited 4 times in total.
Re: Bounty Hunter resurrection and build thread
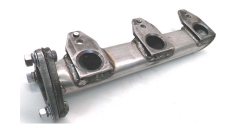
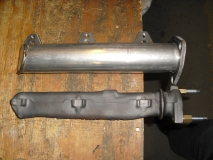
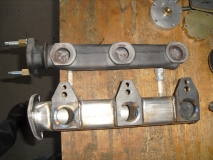
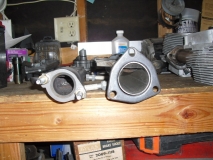
I've got a set of these Dave Kostich 2" log manifolds on the way. I'll likely get them Jet-Hot coated. I had a set of Jones glasspack mufflers made in both 3" x 14" and 3" x 15" to try on for size. The current setup is 12" x 3.5"
Re: Bounty Hunter resurrection and build thread
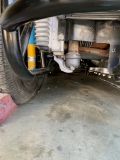
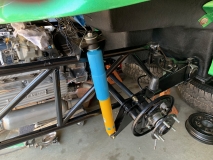
I've got new Bilstein shocks all the way around.
I started working on the rear brakes. I think I have some wrong springs so a new set is on the way.
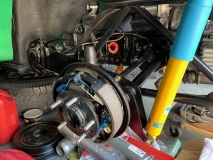
I started working on the rear brakes. I think I have some wrong springs so a new set is on the way.
Last edited by dlyle on Fri Jul 24, 2020 5:56 am, edited 1 time in total.
Re: Bounty Hunter resurrection and build thread
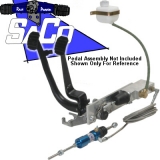
I'm going to try the Saco hydraulic kit that mounts the clutch master in the tunnel. I've read all the posts on here and elsewhere but thought I'd ask here. Does the kit work well?
The cable no matter how well lubed it's going to wear. I've got British cars so I'm used to the occasional rebuild of the master or slave cylinders. I use DOT 5 synthetic so they tend to last a loooong time for me knock on wood. While I'm in the tunnel I'll fix the clutch tube just in case.
The cable no matter how well lubed it's going to wear. I've got British cars so I'm used to the occasional rebuild of the master or slave cylinders. I use DOT 5 synthetic so they tend to last a loooong time for me knock on wood. While I'm in the tunnel I'll fix the clutch tube just in case.
-
jsturtlebuggy

- Posts: 652
- Joined: Wed Apr 07, 2010 5:00 am
Re: Bounty Hunter resurrection and build thread
Looking good. I never knew that they made aftermarket exhaust manifolds for Corvair. Are they a lot larger ID then stock.
Yes the SACO hyd clutch setup works well. In the past they had some maching problems with the master cylinders. That been awhile back, so I sure they have it fixed.
Hopefully we get to see this Bounty Hunter at a meet in the future.
Yes the SACO hyd clutch setup works well. In the past they had some maching problems with the master cylinders. That been awhile back, so I sure they have it fixed.
Hopefully we get to see this Bounty Hunter at a meet in the future.
Joseph
Manx Club #1095
Having fun with Buggies since 1970
Worked in VWs in shops since 1970
Manx Club #1095
Having fun with Buggies since 1970
Worked in VWs in shops since 1970
Re: Bounty Hunter resurrection and build thread
I've read probably just about every review out there on the Saco kit. Some people struggle and end up throwing in the towel. I'll see what it looks like and decide the best path forward.jsturtlebuggy wrote:Looking good. I never knew that they made aftermarket exhaust manifolds for Corvair. Are they a lot larger ID then stock.
Yes the SACO hyd clutch setup works well. In the past they had some maching problems with the master cylinders. That been awhile back, so I sure they have it fixed.
Hopefully we get to see this Bounty Hunter at a meet in the future.
Yes, not sure what the stock manifold is but these will be 2". Dave also makes a 2.250" manifold but that would be overkill for my stock engine.
Re: Bounty Hunter resurrection and build thread
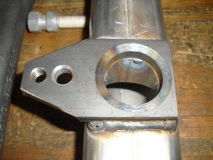
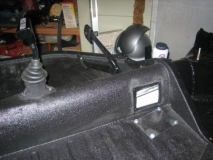
Another option would be repairing this section to accept a clutch master next to the brake master.
These are big holes to fill. If I just repair the admiral's hat I still need fiberglass repair and paint. At that point it might be better to extend the steel up to meet the fiberglass after cutting the glass straight. That would give lots of strength and would give plenty of room to mount a clutch master.
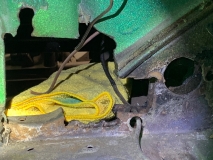
These are big holes to fill. If I just repair the admiral's hat I still need fiberglass repair and paint. At that point it might be better to extend the steel up to meet the fiberglass after cutting the glass straight. That would give lots of strength and would give plenty of room to mount a clutch master.
Re: Bounty Hunter resurrection and build thread
why not, your repair plan sounds good. your almost done, here's some pics of my 3 DESERTER GS for encouragement , all vw stock power.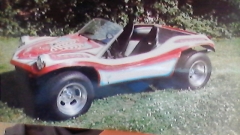
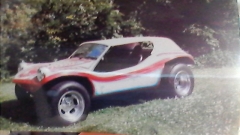

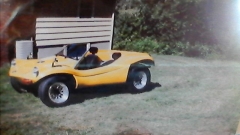 don't slow down now!
don't slow down now!-
jsturtlebuggy
- Posts: 652
- Joined: Wed Apr 07, 2010 5:00 am
Re: Bounty Hunter resurrection and build thread
For the Kick Out SS that was given away, I fab up a bracket that fit inside the tunnel to hold a small Wilwood master cylinder 5/8" bore. Modified the clutch cable cross shaft to fit the clevis end of the master cylinder. And use the small remote reservoir and hose that came with the master cylinder kit and mounted it to the body firewall.
The Kick Out SS uses a Subaru trans and engine. So I had to plumb it to use with a stock Subaru slave cylinder.
CNC is now out of business, so finding their slave cylinder is harder to find. I been using the slave cylinders that Speedway Motors sells. Their own brand that looks exactly like a CNC except it is purple anodized and cheaper in price. Wilwood has one that that looks like a CNC too, but is more expensive.
Joseph
Manx Club #1095
Having fun with Buggies since 1970
Worked in VWs in shops since 1970
Manx Club #1095
Having fun with Buggies since 1970
Worked in VWs in shops since 1970

Re: Bounty Hunter resurrection and build thread
Did you get the U -pipes to go with the headers? I've heard he David is making those also.dlyle wrote:I've got a set of these Dave Kostich 2" log manifolds on the way. I'll likely get them Jet-Hot coated. I had a set of Jones glasspack mufflers made in both 3" x 14" and 3" x 15" to try on for size. The current setup is 12" x 3.5"
Mike Dario
Mohave Valley, AZ
Manx Club #957
Manx Club President
Tow'd (Hers)
Manxvair (His)
Manxter Dual Sport #30 Baja Edition #2 (Ours)
Resorter #19-Fuscia(under construction)
Mohave Valley, AZ
Manx Club #957
Manx Club President
Tow'd (Hers)
Manxvair (His)
Manxter Dual Sport #30 Baja Edition #2 (Ours)
Resorter #19-Fuscia(under construction)
Re: Bounty Hunter resurrection and build thread
I did get the u pipes too although they will need to be reworked t make a tighter radius.
Re: Bounty Hunter resurrection and build thread
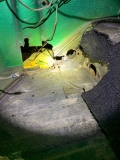
It's been a while since I posted but I am making progress. I made a splash mold from another buggy and used it for the general shape of the repair. Once I had that I fixed it to the front side and added a layer of wax paper and starter laying down resin and fiberglass.
- IMG_6532.jpg (131.77 KiB) Viewed 2484 times
- IMG_6534.jpg (123.33 KiB) Viewed 2484 times
- IMG_6533.jpg (98 KiB) Viewed 2484 times
Last edited by dlyle on Wed Apr 20, 2022 12:21 am, edited 1 time in total.
Re: Bounty Hunter resurrection and build thread
A little sanding and some paint and the hole is now gone. The paint match is not ideal but the area where it's blended is covered by upholstery so will never show. There is also some black over spray that makes the older green look a little different.
This was the splash mold I made and used for the repair.
- IMG_6557.jpg (101.14 KiB) Viewed 2484 times
- IMG_6700.jpg (101.84 KiB) Viewed 2484 times
This was the splash mold I made and used for the repair.
- IMG_6714.jpg (740.73 KiB) Viewed 2484 times