I am just about ready to start welding the chassis back together. For those of you that have not followed this repair, please see "Need Advice on a Frustrating build" and "Fix Before Somebody gets Killed".
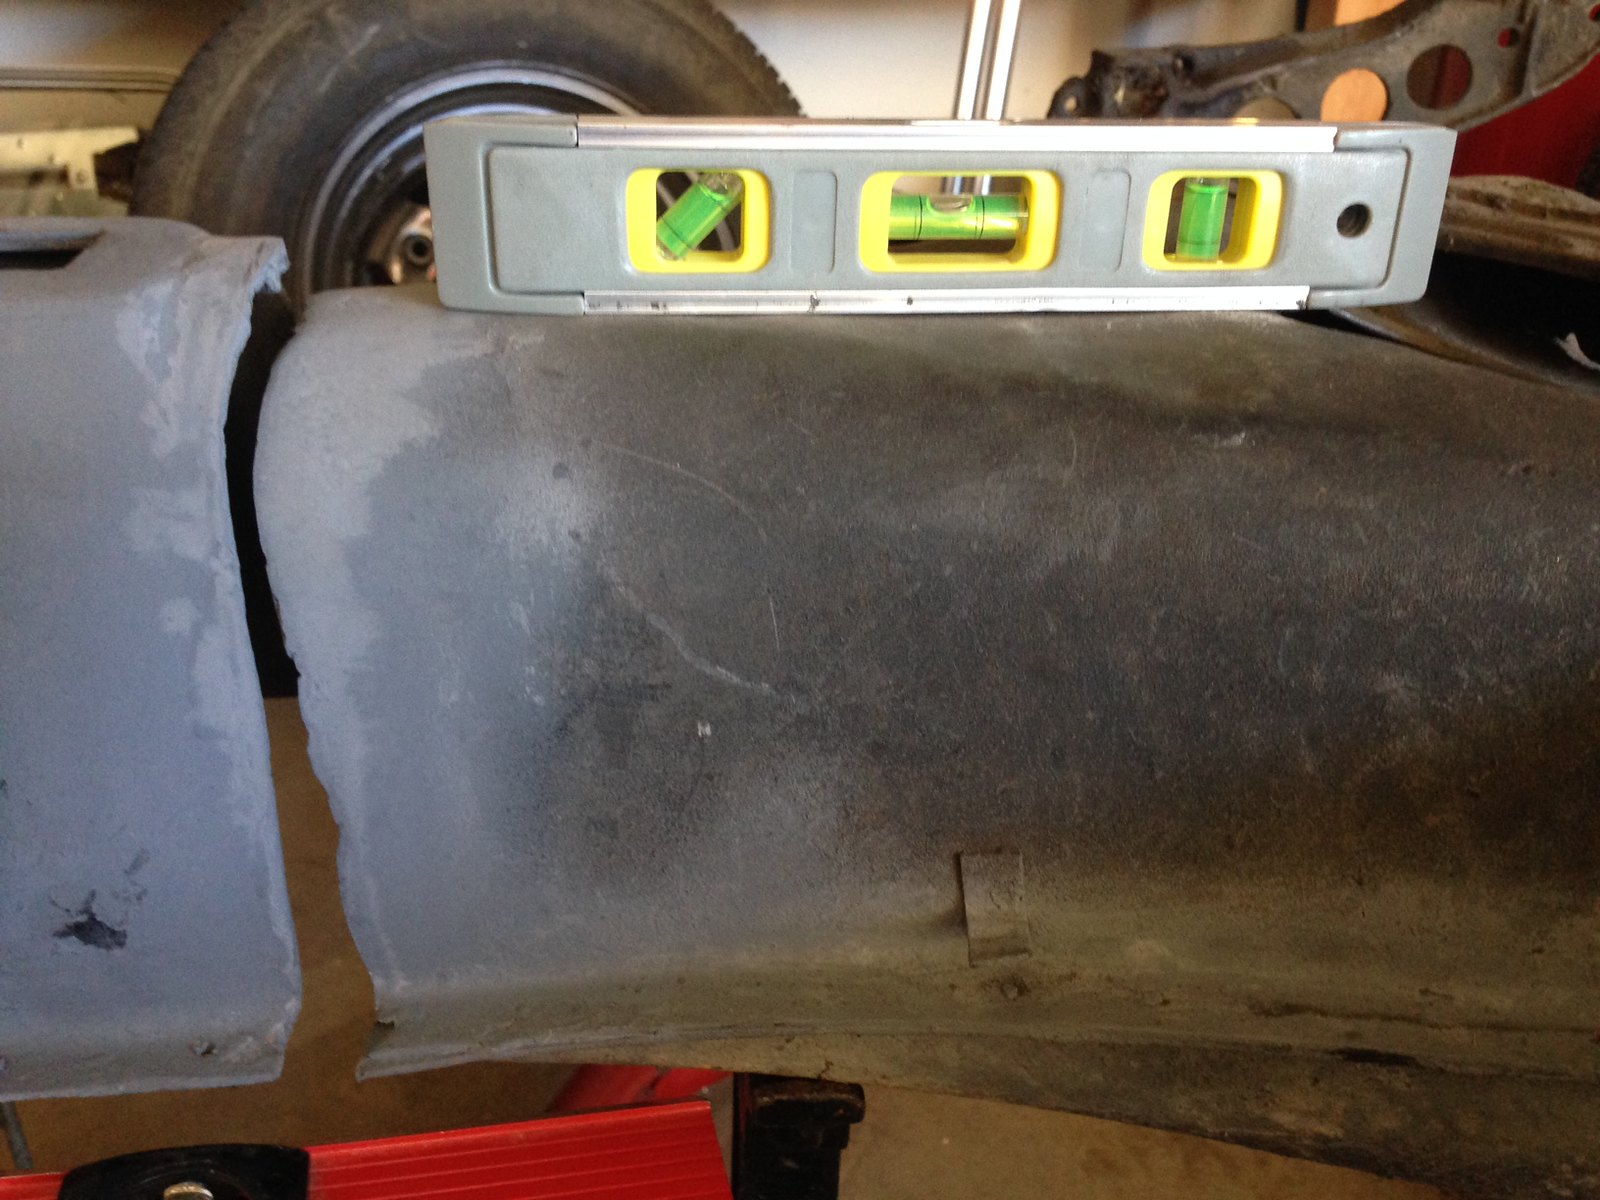
I have asked this before, but for some reason it is not sinking in. Please click on the link and look at the pic. My question is, does this look like all of yours before you did the re-working of the tunnel shape? As you can see, I have a zero bubble (level), but there is a good 3/8 - 1/2 gap at the top of the tunnel. The front part of the tunnel is level as well. I have read that at some point, you would have to heat the tunnel, get a 5lb hammer, and go to town. It just looks like a lot of hammering to me. My question is, am I correct to assume this is the way it is suppose to be, and I am ready to heat and hammer?
I am assuming that the bottom lip is aligned and the top of the tunnel is shorter on one side than the other. Not knowing myself the proper way to do it, the things I would consider would be if you align it at the bottom, how is that going to affect the tunnel structure with the top of the tunnel offset that much from one side to the other (Do you pound one side down, or just fill the gap?). If you align the top, how much pounding will you have to do on the lower lip to put the floor pans in properly. Finally, what compromises would you need to look for if you split the difference top to bottom. My thought is that it doesn't have to be perfect, just close. Buggies are so small and light that you won't get allot of irregular tire wear once all the wheels are aligned, so long as you can get fairly close. And I wouldn't worry so much about level if the sides do match up. Just raise the half of the pan that's lower until it lines up straight and start welding. Once it is welded and back on the ground, it won't make any difference.
It only matters that front and rear are square meaning Xed and same wheel base. The tunnel is the strength of the chassis make it as tight as fit as possible. The sides need to be straight for body to mount. If the sides are straight the center body humps work. The pan keeps you from falling out. Least of your worries. All this is IMO.
stop trying to line up were floor attaches. get top of tunnel to same height as front half tunnel top. if it was cut correctly the bottom of tunnel which is flat would line up with rear section of tunnel and would be flat. in other words looking underneath you would see no deviation of bottom of tunnel from front section to rear section, it would be straight and flat. the x pattern in metal would line up also. so make sure bottom of tunnel is lined up flat to each other. that is critical it needs to be flat. that should get halves to line up better. as to heat and hammer: you wont need heat, 5 pound hammer will work fine. get that bottom welded flat to match the front half. the tunnel bottom flat all the way back just as factory.once welded in few places you can hammer other areas. it should not take much or shouldn't if was cut correct( but I know this wasn't your case). like others said this is the frame. called backbone construction (Shelby cobras use same backbone construction method). weld it strong not pretty. you can weld overlapping piece on top halve seam (recommended) in general top center lines up sides need little tap.deep penetrating welds are the goal. again flat on tunnel bottom. disregard frame horn tip; it is a way to custom modify how rear trans and engine could gain ground clearance. it is for advanced buggy builders and not at all necessary in your case.
lastmanx wrote:stop trying to line up were floor attaches.
I feel like I was just scolded by my Dad! Ok lastmanx (and everybody else), tonight I did line up using the top and sides of the tunnel. It will not require much hammering (surprise right!?) to get it lined up. I was able to mate up the cut a little better as the builders built it 3/4" to long. Gave me some metal to play with. I'll finish my measuring tomorrow, and start welding Tuesday PM.
Thank you again to all for your help and guidance.
sorry I didn't mean to scold you. from your photo it appeared you were still hung up on the floor edge as a reference point,and I wanted to get that out of your mind. I have encountered other newbies who spend too much effort on floors, trying to reinforce them. keep in mind in the future:the floors are not a structural element of the frame.you can drive a beetle or buggy with them rusted away, I have but don't recommend it. the floors keep your feet from hitting the ground. my best recommendation on floors is to drill a couple 1/4 inch holes in them after they are installed. the holes are to drain out water, from washing or rain. drill one in rear battery tray area at lowest point on both sides. if you don't water gets trapped and will rust floor. you can always cover with a carpet. you can also add them later after your buggy fills with water. I built my buggy and couldn't bring myself to drill holes in new floor. my first trip on vacation with it had a day of rain. the buggy had 1 inch water in it the rest of the week. when you hit brakes a wave of water surged forward into pedal area. nothing could be placed on floor without getting soaked. I drilled them as soon as I got home. as long as you paint the hole it wont rust.
lastmanx wrote:sorry I didn't mean to scold you. from your photo it appeared you were still hung up on the floor edge as a reference point,and I wanted to get that out of your mind.
Lastmanx, I needed scolding as I WAS still hung up on the pan mounting ledges not lining up. I'm really anal and it still bothers me, but looks as if it will not be that tough to transition the two heights. Thanks for the tip on the drain holes.
Ya know guys, being a newby to this, I am trying to get advice/opinions as to the best way to rebuild this thing. As you can see, I have posted looking for the correct way to re-weld the tunnel cut after doing repair and re-measuring. Certainly, it can be a little confusing, hence the thread.
Problem is, I have been told to line up the top and sides of the tunnel and disregard the pan mounting lips, pounding them close after welding. I have been told to line up the bottom of the tunnel and the pan mounting lips, then pound the sides and top of the tunnel after welding. I guess what I am trying to say is, apparently there is not just one way to build these.
I am just looking for the right way, and provides the most stable and straight chassis possible. I am NOT trying to start a thread war, just, as I said, looking to do this right after buying this POS and trying to fix it into a nice buggy.
I guess I have been taken out of context regarding my last post, as I am not ignoring advice, just getting two different versions on how to do this. With that said, it appears the general consensus is to mate from the top, which I am going to do. Thank you lastmanx and others who have pitched in on this. I truly appreciate any and all advice.
please go to manx resources page click on business card of turn key manx;then click on floors page, you will see photos of what it should look like when cut and welded correctly. look over the entire site you will see photo of vw frame with no floors; this is the backbone frame that is the strength of the vw before being cut. you will see a section behind the park brake mount that looks straight and even it is that 14 inch area that is removed.so when welded back together they line up very closely needing few hammer hits on sides as the curved sides are slightly wider towards rear.when cut correctly they are easily mated back together. I know yours was not. which is why your getting different answers as everyone is trying to help out with your mess. I looked over the turn key manx site and saw photos,you should too. I am not associated with them. look at the finished ones and you will understand what our words are trying to describe.look how well it all lines up;its why you cut 14 inches not 20 inches. also see photo of vw with everything except body that is what a dunebuggy is all about. it is shortened to get shorter wheelbase causing tighter turning radius, shorter to bring weight of driver passenger closer to rear wheels for traction. a dune buggy will work offroad without being shortened but will have wider turn radius etc. its called a manxter,no cutting required. Baja bugs use full frame also. I hope this helps.
so what happened? are you understanding clearly what should be done? just wondering if you need more advice, I was once a newbie so I can understand it seems overwhelming. keep smiling.
 by l8ndeb, on Flickr