Fiberglassing New Fiberglass Dash to Manx 1 Hood
Posted: Wed Jan 14, 2015 1:02 am
I did a thread on this on the Samba but figured it would be helpful here.
I have done this on 4 Manxes now and found this to be the easiest way to accomplish this task. (others may have a better way and I welcome any comments)
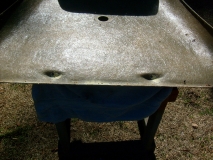
I start with the bare hood (no bracket or ABS dash.
I made a stand so it is at a good level for me.
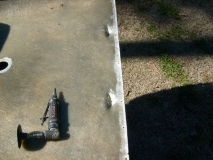
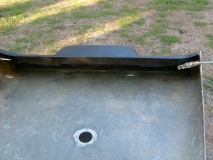
I then use an angle grinder to rough up the underside of the hood where it will attach to the dash. This gives a good bonding surface for the resin to bond to.
I then match the two parts to see how well they match up. I then grind away the high spots on the hood. (it is usually thinner and faster to sand)
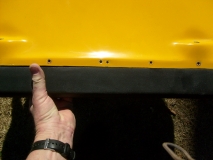
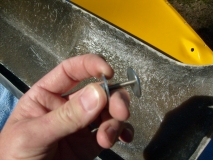
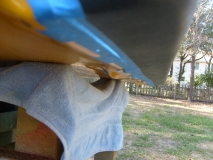
I use stainless steel bolts and fender washers to hold the parts in place. (I used the existing holes in the hood to run the bolts)
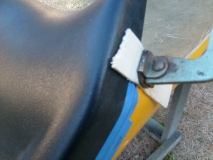
I use welding clamps to hold the lower outside edges flush.
You can see that I also roughed up the inside of the dash.
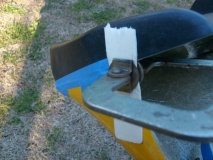
Here are the clamps I use and you can see that I used a paint stick to protect the gel coat.

I ran some painters tape at the joint to keep the resin from dripping through.
Here is the first layer of glass and resin layed out. Try not to get it on the bolts. (not too big a deal if you do just easier later when you remove them)
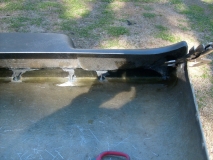
You want to glass the corners at the bottom as well.
Once you have a few layers down and it cures out you can remove the bolts.
With the bolts removed and the lower corner bonded securely I move the clamps up to match the edge of the hood to the dash.
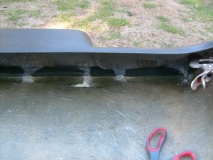
Now you want to lay down a few more layers of glass to cover the hole spaces. You also want to make sure you get the corners as well.
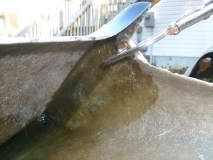
Here you can see that I have glassed the entire side up to the "bottom" of the hood and dash.
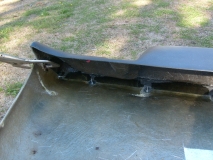
Here is the outside view.
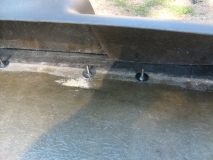
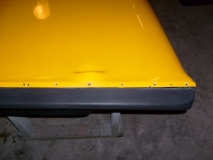
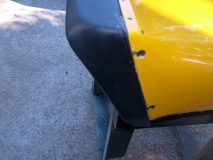
After the resin cures out completely, all tape and clamps are removed. You will notice that one or both sides will be a little uneven. This is because the dash is made to go under the hood as well and is just a bit short of the hood outside dimension. Do not worry about this since the windshield will cover this up and will never be seen.
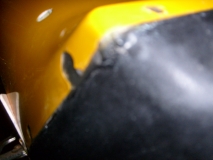
Not the best picture but you can see it better here. The excess resin will also be covered up.
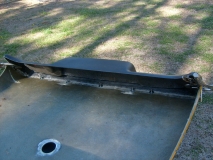
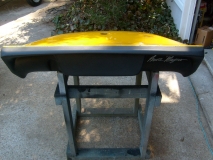
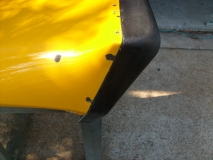
View of completed hood dash assembly.
Comments and questions are welcome.
Vince
I have done this on 4 Manxes now and found this to be the easiest way to accomplish this task. (others may have a better way and I welcome any comments)
I start with the bare hood (no bracket or ABS dash.
I made a stand so it is at a good level for me.
I then use an angle grinder to rough up the underside of the hood where it will attach to the dash. This gives a good bonding surface for the resin to bond to.
I then match the two parts to see how well they match up. I then grind away the high spots on the hood. (it is usually thinner and faster to sand)
I use stainless steel bolts and fender washers to hold the parts in place. (I used the existing holes in the hood to run the bolts)
I use welding clamps to hold the lower outside edges flush.
You can see that I also roughed up the inside of the dash.
Here are the clamps I use and you can see that I used a paint stick to protect the gel coat.
I ran some painters tape at the joint to keep the resin from dripping through.
Here is the first layer of glass and resin layed out. Try not to get it on the bolts. (not too big a deal if you do just easier later when you remove them)
You want to glass the corners at the bottom as well.
Once you have a few layers down and it cures out you can remove the bolts.
With the bolts removed and the lower corner bonded securely I move the clamps up to match the edge of the hood to the dash.
Now you want to lay down a few more layers of glass to cover the hole spaces. You also want to make sure you get the corners as well.
Here you can see that I have glassed the entire side up to the "bottom" of the hood and dash.
Here is the outside view.
After the resin cures out completely, all tape and clamps are removed. You will notice that one or both sides will be a little uneven. This is because the dash is made to go under the hood as well and is just a bit short of the hood outside dimension. Do not worry about this since the windshield will cover this up and will never be seen.
Not the best picture but you can see it better here. The excess resin will also be covered up.
View of completed hood dash assembly.
Comments and questions are welcome.
Vince