Yes Joe, you dojoescoolcustoms wrote:Nice! Also, do I see a curved, copper Hurst?
Bud's Manx Restoration
Re: Bud's Manx Restoration
Bud Zeller
Wilmington, NC
Manx Club Member Since 2004 - #2475
Member of the Manx Club's Long Haul League - 2015
2018 NORRA Mexican 1000 - #1356 - Bad News Racing
2022 NORRA Mexican 1000 - #3347 - Bad News Racing & ACME Companies
2023 NORRA Mexican 1000 - #1356 - Bad News Racing
'68 Meyers Manx - M1996F826S
'66 VW Kombi Bus
'73 VW Thing

Re: Bud's Manx Restoration
Update 2/23
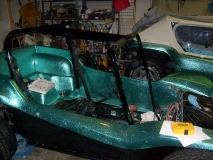
Bud came up to help with the dash layout and some other things this week end. It was great to see Bud and his help was invaluable.
When I restore a buggy for myself it is relatively straight forward to set up the dash. When I am doing it for someone else, it makes it easier (for me anyway) to have them there to lay it out the way it will work best for them. It also gives them a chance to see it in person instead of by pictures over the internet.
Bud helped get the roll cage back in. We also got to have fun seeing what was behind the "Do Not Remove" cover on the seat belt retract assembly.
It was also very helpful for Bud to come by because he caught the dash spacing issue before it went too far.
When the ABS dash was made into a fiberglass dash, it was made to be glassed to the dash or go under the dash. This means that the exposed top portion of the dash sticks into the passenger area about an 1 1/2" more than the ABS dash if you glass it directly to the hood. This does not cause a problem if you have no roll cage that was made to fit close to the original dash. Bud reminded me that this might be an issue. It was!
To correct this I needed to remove the 1 1/2" of the dash so it would fit inside the roll cage.
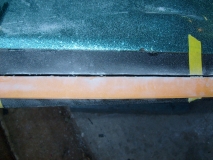
I marked it out on painters tape and taped off the cut line.
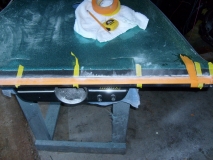
Cut it with an oscillating tool. (Thanks for the idea Tom Thompson)
You can see that the tool makes a straight cut without damaging the gel coat. A saw or reciprocating blade tends to beat up the surrounding area and can stress or chip the paint and/or gel coat.
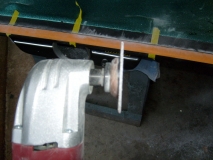
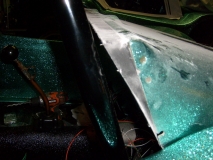
So with the dash removed I could check the fit of the modified dash.
Here is the remains of the dash still on the hood, I was then able to confirm that the cut dash will fit in front of the cage.
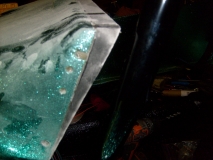
Now to reglass the shortened dash and move on to more wiring.
Vince
Bud came up to help with the dash layout and some other things this week end. It was great to see Bud and his help was invaluable.
When I restore a buggy for myself it is relatively straight forward to set up the dash. When I am doing it for someone else, it makes it easier (for me anyway) to have them there to lay it out the way it will work best for them. It also gives them a chance to see it in person instead of by pictures over the internet.
Bud helped get the roll cage back in. We also got to have fun seeing what was behind the "Do Not Remove" cover on the seat belt retract assembly.
It was also very helpful for Bud to come by because he caught the dash spacing issue before it went too far.
When the ABS dash was made into a fiberglass dash, it was made to be glassed to the dash or go under the dash. This means that the exposed top portion of the dash sticks into the passenger area about an 1 1/2" more than the ABS dash if you glass it directly to the hood. This does not cause a problem if you have no roll cage that was made to fit close to the original dash. Bud reminded me that this might be an issue. It was!
To correct this I needed to remove the 1 1/2" of the dash so it would fit inside the roll cage.
I marked it out on painters tape and taped off the cut line.
Cut it with an oscillating tool. (Thanks for the idea Tom Thompson)
You can see that the tool makes a straight cut without damaging the gel coat. A saw or reciprocating blade tends to beat up the surrounding area and can stress or chip the paint and/or gel coat.
So with the dash removed I could check the fit of the modified dash.
Here is the remains of the dash still on the hood, I was then able to confirm that the cut dash will fit in front of the cage.
Now to reglass the shortened dash and move on to more wiring.
Vince
Re: Bud's Manx Restoration
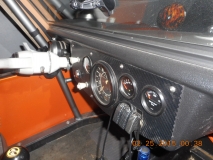
Temporarily installed dash to check clearance.
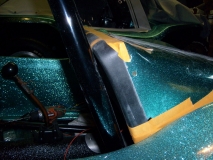
It has about 1/2". Will work fine. I did have to shave a bit more off to get it to fit.
Now on to glassing
Vince
It has about 1/2". Will work fine. I did have to shave a bit more off to get it to fit.
Now on to glassing
Vince

Re: Bud's Manx Restoration
Must have been quite nerve racking to have to cut off the newly glassed dash. Expectedly though, it looks like it was an even, clean cut! Good catch on that!
(Loretta) Manx # M2940D910E on customized 1970 chassis that has been "Wheelerized" by Joescoolcustoms
(Scarlett) Manx Resorter #12 (R0012B931S) on 1969 chassis.
(Gunther) Manx 2 # A0202A035E
Tow'dster # TF530G913S
Original Home built buggy that I learned to drive in back in 1995 (the one that started my passion).
Club Member # 4436
Loretta: http://www.manxclub.com/forum/viewtopic ... t=3365Manx" onclick="window.open(this.href);return false;
Re: Bud's Manx Restoration
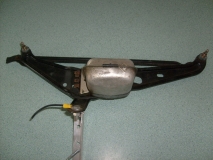
Looks great. Will the windshield wiper motor clear the exiting gauges now you have narrowed the dash front to back?
Re: Bud's Manx Restoration
Brian,
Not too bad to cut it. The good thing about fiberglass is that you can usually cut/sand and start over.
Mike,
It will clear the 68 speedo. I may have to move the "vibrator" on the fuel gauge. Since the original dash had the same spacing it really should not affect it.
Update 2/24
I glassed the dash back on yesterday and it fits fine now. Today I prepped the rear of the dash to mount the speedo. I drilled shallow holes in the back of the dash and used resin thickened with cabosil to bond some stainless steel bolts to the dash. (can see them at 3 and 9 o'clock of speedo hole) Once it cures I will bolt the speedo in.
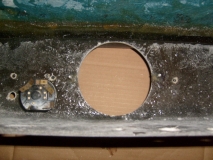
I have used this method on the last 4 buggies I have done, it has worked well and hides the bolt/screw.
Vince
Not too bad to cut it. The good thing about fiberglass is that you can usually cut/sand and start over.
Mike,
It will clear the 68 speedo. I may have to move the "vibrator" on the fuel gauge. Since the original dash had the same spacing it really should not affect it.
Update 2/24
I glassed the dash back on yesterday and it fits fine now. Today I prepped the rear of the dash to mount the speedo. I drilled shallow holes in the back of the dash and used resin thickened with cabosil to bond some stainless steel bolts to the dash. (can see them at 3 and 9 o'clock of speedo hole) Once it cures I will bolt the speedo in.
I have used this method on the last 4 buggies I have done, it has worked well and hides the bolt/screw.
Vince
-
joescoolcustoms

- Posts: 286
- Joined: Mon Jun 03, 2013 5:00 am
- Location: Saint Albans, WV
Re: Bud's Manx Restoration
Nice work as always Vince!
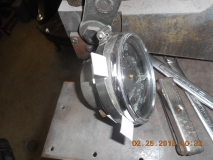
As another wiper mechanism fit solution tip, cut off the two mounting tabs smooth on the gauge housing, and slip in the stock speedo from the rear. To hold it in place, use a radiator style hose clamp pushed up against the fiberglass with 4 to 6 pieces of metal between the housing and hose clamp to keep the thin hose clamp from slipping through the cut hole, keeping the gauge tight. This will gain about 1/2 inch more clearance. Not a lot, but most times just enough.
As another wiper mechanism fit solution tip, cut off the two mounting tabs smooth on the gauge housing, and slip in the stock speedo from the rear. To hold it in place, use a radiator style hose clamp pushed up against the fiberglass with 4 to 6 pieces of metal between the housing and hose clamp to keep the thin hose clamp from slipping through the cut hole, keeping the gauge tight. This will gain about 1/2 inch more clearance. Not a lot, but most times just enough.

Re: Bud's Manx Restoration
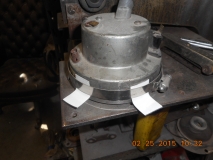
When you have a chance Vince, can you post a picture of the wiper assembly you'll be using.
Thanks
Thanks
Mike Dario
Mohave Valley, AZ
Manx Club #957
Manx Club President
Tow'd (Hers)
Manxvair (His)
Manxter Dual Sport #30 Baja Edition #2 (Ours)
Resorter #19-Fuscia(under construction)
Mohave Valley, AZ
Manx Club #957
Manx Club President
Tow'd (Hers)
Manxvair (His)
Manxter Dual Sport #30 Baja Edition #2 (Ours)
Resorter #19-Fuscia(under construction)
Re: Bud's Manx Restoration
Thanks Joe!
Do you have a picture of your process? How far does the face of the speedo stick out of the dash?
Do you have a picture of your process? How far does the face of the speedo stick out of the dash?
Re: Bud's Manx Restoration
Sure Mike, it is a 67 12 volt assy, will post pics tomorrow.
-
joescoolcustoms
- Posts: 286
- Joined: Mon Jun 03, 2013 5:00 am
- Location: Saint Albans, WV
Re: Bud's Manx Restoration
Not earth shattering clearance, but a touch more if it is crowded right up against the wiper movement.surfnc wrote:Thanks Joe!
Do you have a picture of your process? How far does the face of the speedo stick out of the dash?
Plus, it will match rear mounted accessory gauges decently.
(Can hardly wait to bust that buggy out of storage in another month!!!)
Re: Bud's Manx Restoration
Joe, how and what keeps the gauge from "falling" through the front opening? I know you mentioned something about metal on the back but I'm having a hard time visualizing that.joescoolcustoms wrote:Not earth shattering clearance, but a touch more if it is crowded right up against the wiper movement.surfnc wrote:Thanks Joe!
Do you have a picture of your process? How far does the face of the speedo stick out of the dash?
Plus, it will match rear mounted accessory gauges decently.
Bud
Bud Zeller
Wilmington, NC
Manx Club Member Since 2004 - #2475
Member of the Manx Club's Long Haul League - 2015
2018 NORRA Mexican 1000 - #1356 - Bad News Racing
2022 NORRA Mexican 1000 - #3347 - Bad News Racing & ACME Companies
2023 NORRA Mexican 1000 - #1356 - Bad News Racing
'68 Meyers Manx - M1996F826S
'66 VW Kombi Bus
'73 VW Thing
Wilmington, NC
Manx Club Member Since 2004 - #2475
Member of the Manx Club's Long Haul League - 2015
2018 NORRA Mexican 1000 - #1356 - Bad News Racing
2022 NORRA Mexican 1000 - #3347 - Bad News Racing & ACME Companies
2023 NORRA Mexican 1000 - #1356 - Bad News Racing
'68 Meyers Manx - M1996F826S
'66 VW Kombi Bus
'73 VW Thing
-
joescoolcustoms
- Posts: 286
- Joined: Mon Jun 03, 2013 5:00 am
- Location: Saint Albans, WV
Re: Bud's Manx Restoration
Just simple small pieces of sheet metal cut into strips, then bent at a 90* angle. One end tucked under the hose clamp, the other against the front side of the fiberglass, or the dash metal plaque.rzeller wrote:Joe, how and what keeps the gauge from "falling" through the front opening? I know you mentioned something about metal on the back but I'm having a hard time visualizing that.joescoolcustoms wrote:Not earth shattering clearance, but a touch more if it is crowded right up against the wiper movement.surfnc wrote:Thanks Joe!
Do you have a picture of your process? How far does the face of the speedo stick out of the dash?
Plus, it will match rear mounted accessory gauges decently.
Bud
Re: Bud's Manx Restoration
Gotcha. Thanks. I'm a visual learner - I love pictures 
Bud Zeller
Wilmington, NC
Manx Club Member Since 2004 - #2475
Member of the Manx Club's Long Haul League - 2015
2018 NORRA Mexican 1000 - #1356 - Bad News Racing
2022 NORRA Mexican 1000 - #3347 - Bad News Racing & ACME Companies
2023 NORRA Mexican 1000 - #1356 - Bad News Racing
'68 Meyers Manx - M1996F826S
'66 VW Kombi Bus
'73 VW Thing
Wilmington, NC
Manx Club Member Since 2004 - #2475
Member of the Manx Club's Long Haul League - 2015
2018 NORRA Mexican 1000 - #1356 - Bad News Racing
2022 NORRA Mexican 1000 - #3347 - Bad News Racing & ACME Companies
2023 NORRA Mexican 1000 - #1356 - Bad News Racing
'68 Meyers Manx - M1996F826S
'66 VW Kombi Bus
'73 VW Thing
Re: Bud's Manx Restoration
Here you go Mike.