First Build thread of 2015 and of the new Forum - Loretta

How-to building, restoration, repairs, and fun with your authentic Manx!
Post Reply
User avatar
joescoolcustoms
Posts: 286
Joined: Mon Jun 03, 2013 5:00 am
Location: Saint Albans, WV

Re: First Build thread of 2015 and of the new Forum - Lorett

Post by joescoolcustoms »

TSFR wrote:As always...NICE Work! I have a question about what appears to be (may not be) spider cracks in the hood. How do you fix those and is it from flex or the fiberglass drying out? Thanks for the awesome lesson Joe!
Thank you!

The "cracks" shown are not cracks in the hood. Those are actually scratches in the gel coat. Where I have ground the fiberglass, I have that talc powder like dust over the body and hood. It is in the scratches making them stand out.

For repair of gel cracks, it will depend on the crack itself. I know that sounds vague, but, it really does. How deep are they, what caused them, are they raised, is the glass underneath also fractured. Loretta's body has one spider crack that was from a rock or something pushing up from underneath and it is now "proud" and slightly sticks out. That will get ground out and new mixed Cabosil applied back in it's place.

There are some flexed cracks on the former side doors that will have to get slightly opened up and resin applied in the crack. This body does not have any sun dried cracks in the gel. But if it did, the surface would need to come off by sanding and slick sand or another comparable material applied.

I will be showing some of these repairs.
User avatar
manxvair
Posts: 744
Joined: Tue Mar 30, 2010 5:00 am
Location: Mohave Valley, AZ

Re: First Build thread of 2015 and of the new Forum - Lorett

Post by manxvair »

INCREDIBLE! Great work Joe, I don't know what is more work, the FG repair or the detailed write up!
Mike Dario
Mohave Valley, AZ
Manx Club #957
Manx Club President

Tow'd (Hers)
Manxvair (His)
Manxter Dual Sport #30 Baja Edition #2 (Ours)
Resorter #19-Fuscia(under construction)
User avatar
surfnc
Posts: 89
Joined: Mon Oct 11, 2010 5:00 am
Location: Outer Banks NC 27954

Re: First Build thread of 2015 and of the new Forum - Lorett

Post by surfnc »

Joe,
FANTASTIC Work and step by step description!!!

The reason I do not like to lay up more than 4 layers is that the matt or cloth tend to "float" in the resin the more layers you lay up. I have found that I can keep the resin to glass ratio (less resin more glass) if I limit the layers to 4. Others may not have this problem. It also keeps the repair from heating up due to relatively large amounts of resin concentrated in a small area.

Keep up the good work, Brian is going to have a very nice strong Manx when you are done.

Vince
User avatar
joescoolcustoms
Posts: 286
Joined: Mon Jun 03, 2013 5:00 am
Location: Saint Albans, WV

Re: First Build thread of 2015 and of the new Forum - Lorett

Post by joescoolcustoms »

Thank you Vince!! What you see is taken a lot from you guiding me and the seminars you have put on at MOTB events. I also have to give credit to Chris L. for his advice too.

Mike, to answer which takes the most time, yes.
User avatar
abgiles
Posts: 226
Joined: Thu Jan 01, 1970 1:00 am
Location: Yulee, FL

Re: First Build thread of 2015 and of the new Forum - Lorett

Post by abgiles »

I am totally amazed at the detail that's gone into Loretta thus far, and I'm sure that my jaw will be dropping for the rest of Joe's work. Again, if you didn't already know, I'm honored to have him take this on.

Now, for the not so good news. I've done a number of flips on VW's in the past, and thought I had found a great one to flip to help cover the cost of Loretta's restoration. I found a 1971 Super Beetle that had a great body, solid pans, wonderful heater channels, only 99k original miles, that "just needed some carb work done" to get her back on the road. Due to the fact that she hadn't been on the road in a year, and that the weather had been extremely cold, the previous owner (a nice young lady and her husband) couldn't start her due to a dead battery.

I gave it a very good look, saw the small issues, new interior, recent tune-up receipts (ok, 2 years ago, and 500 miles ago is recent in some VW areas), and thought it was too good of a deal to pass up. I aired up the tires, towed it back to m place, spent a few days polishing it up, waiting for a little bit of warmer weather to brave the ungodly temperatures here (It was in the 50's, too cold to go outside). Finally, a great day to do some work today, and I got to business. Adjusted the valves, new plugs installed, cleaned up the motor area, new air filter, new battery, etc.. you get the idea. Time to fire her up. Well, the issue with the carb didn't exist. What did exist was a persistent knocking from the motor. I let it warm up for a few minutes, drained the oil, removed the plate and screen, to find chunks of metal inside. Not small shavings, but what looked like bullet casing edges. Ok, thinner than a brass casing, but clearly defined edges of a thin metal in there.

So... I guess this one was a bust. Fortunately, for the price I paid, I'll recoup the money I've spent (or I'll hold onto her until I can get the engine rebuilt). I am glad I only spent what I saw, and not what I was told. If I had paid for a bug that only needed "some carb work" to get her on the road, I'd be a little more upset.

There's no way I could even attempt to try and sell it as a running vehicle. I've seen too many people taken advantage of (as we've all had done to us, seen, or heard about) to try and sell it as a running vehicle. It's a great little car for somebody that has the time to rebuild the motor. Unfortunately, I don't at this point, as Loretta is my focus, so I'll break even, and call it a day. At least I had a few evenings of tinkering to have some fun!
(Loretta) Manx # M2940D910E on customized 1970 chassis that has been "Wheelerized" by Joescoolcustoms
(Scarlett) Manx Resorter #12 (R0012B931S) on 1969 chassis.
(Gunther) Manx 2 # A0202A035E
Tow'dster # TF530G913S
Original Home built buggy that I learned to drive in back in 1995 (the one that started my passion).
Club Member # 4436

Loretta: http://www.manxclub.com/forum/viewtopic ... t=3365Manx" onclick="window.open(this.href);return false;
User avatar
joescoolcustoms
Posts: 286
Joined: Mon Jun 03, 2013 5:00 am
Location: Saint Albans, WV

Re: First Build thread of 2015 and of the new Forum - Lorett

Post by joescoolcustoms »

Thanks Brian! I am a little slower than what I wanted to be, but I try to make progress every day, some days a lot more than others.

We are do to have a "Ungodly" temperature day of 50* F on Wednesday, and I thought about getting the chassis ready to sand blast, but, that will come at the right time. I am not ready to split the body from the chassis just yet. So, onto the fuel tank, rear bumper and some suspension work.
User avatar
abgiles
Posts: 226
Joined: Thu Jan 01, 1970 1:00 am
Location: Yulee, FL

Re: First Build thread of 2015 and of the new Forum - Lorett

Post by abgiles »

Joe,
Please don't worry about slow. It took Michelangelo more than a number of weeks to paint the Sistine Chapel, and quality is worth the wait. I know it's been heck trying to coordinate the additional work you've had to do with the weather up there, and although I'm anxious to get her on the road, I'm also realistic in knowing that it's going to be a number of months before she's ready for her shake-down cruise, so additional time to get things done doesn't matter.
(Loretta) Manx # M2940D910E on customized 1970 chassis that has been "Wheelerized" by Joescoolcustoms
(Scarlett) Manx Resorter #12 (R0012B931S) on 1969 chassis.
(Gunther) Manx 2 # A0202A035E
Tow'dster # TF530G913S
Original Home built buggy that I learned to drive in back in 1995 (the one that started my passion).
Club Member # 4436

Loretta: http://www.manxclub.com/forum/viewtopic ... t=3365Manx" onclick="window.open(this.href);return false;
User avatar
joescoolcustoms
Posts: 286
Joined: Mon Jun 03, 2013 5:00 am
Location: Saint Albans, WV

Re: First Build thread of 2015 and of the new Forum - Lorett

Post by joescoolcustoms »

I need to get my metal shear off on the tubing bender stand, but needed to do one more job with it first. I need to address the fuel tank.

Before doing anything else with a used fuel tank, it is imperative to properly clean it and remove any explosive vapors. Several ways to do this. I go with a tried method that is basic and gets it done for me. I use an industrial solvent soap that is made to cut petroleum products. Simple Green and the like are good soaps for this. But, what I do not do is follow the mix instructions. It has a mix ratio for doing certain specific jobs. I do not mix it until later in the cleaning process. I use 1/2 gallon direct into the tank. slosh it all around, (very good work out for the upper body and shoulders). After about 5 good minutes of agitation, I introduce about 1 gallon of the hottest water I can get out of the sink into the tank and repeat the process of agitation, (more upper body workout). Rinse 4 times with hot water. If you still have a fuel smell, repeat.

I like this cleaner due to the "New Fresh Scent". Makes me think Spring is here.

817

The bottom tap on the tank has a internal riser to help keep from allowing the sludge/sediment and dirt get into the fuel line. It also keeps you from being able to get all the fuel out of the tank.

818

In most buggy's, the fuel tank sits at more of a angle than in the original Beetle. This tilts the tank and makes it hard to get all the fuel capacity use. You can see here where the tap is on the rear, at a angle and allows the fuel to sit in the front unused.

819

I slipped the passenger side trailing arms in the beam, loosely installed a spindle and tie rod for checking clearance.

820

Then raised the spindle up and clamped a board to it to hold it at the highest re-bond position putting the tie rod at it's highest point and closest it will ever get to the tank.

821

Take some measurements of the clearance through out the movement of the tie rod.

822

823

Laid out a sump on some scrap 14 gauge steel left over from the floor pieces.

824

Cut it out with the throatless shear.

825

Bend the sump in a wedge for the fuel tank.

826

And you can get the basic idea of the new sump on the bottom of the tank. The outlet tap will be moved toward the bottom so as to get almost all of the capacity for those long cruises. Of course cutting, final fitting and welding needs to be done, but that is the jest of the fuel tank lower portion modification. This will add about another 3/4 gallon to the capacity of the tank, in addition to getting almost 100% of the fuel out of it.

827
User avatar
joescoolcustoms
Posts: 286
Joined: Mon Jun 03, 2013 5:00 am
Location: Saint Albans, WV

Re: First Build thread of 2015 and of the new Forum - Lorett

Post by joescoolcustoms »

Finished the lower fuel tank modification.

Since the filler was a piece of 1 1/4 threaded Pipe, that was bubble gum welded in the tank, then lead soldered to seal, the best way to deal with that area is just to cut it out and weld in a new piece of steel. When the new riser is ready to be located, the metal is fresh and not cobbled together.

828

Once the bottom of the tank was cut out, the bottom tap can be cut and prepped to weld into the new sump bottom.

829

The original bottom of the tank was rusted a little with a outline out what looked like a water puddle at some point. Not serious rust, but enough to start flaking and clogging a carburetor.

831

Since the bottom was removed, the interior of the tank can be inspected. It had just surface rust. It actually looked pretty good compared to most I pull apart.

830

The bottom tap was welded in, and the top plate where the new riser will be located was welded also. I then did a quick sand blast of the interior of the tank to clean it up and give a good surface for the interior coating to grab and stick to.

832

Then weld the new sump on.

833

834

Here it can be seen the additional volume the new sump give to the tank compared to another original tank.

835

836

Placed back in the buggy, there is about 3/4 inch clearance between the tie rod and the tank at it's closest position.

837

Here it can be seen the additional volume the new sump gives and the low position of the bottom tap location. It should give Brian a usable 9.5 to 10 gallons of fuel. Most buggy's are lucky to get 8.5 gallons use out of the tank, and some less than that.

838

839

The top is welded and ready for the new riser to be located and welded in.

840
User avatar
vincent9993
Posts: 793
Joined: Tue Apr 13, 2010 5:00 am

Re: First Build thread of 2015 and of the new Forum - Lorett

Post by vincent9993 »

Very cool Joe, you're braver than I am taking on welding a used fuel tank... That extra capacity will come in handy for the desert crossings. Did you consider adding baffles inside the tank?
User avatar
joescoolcustoms
Posts: 286
Joined: Mon Jun 03, 2013 5:00 am
Location: Saint Albans, WV

Re: First Build thread of 2015 and of the new Forum - Lorett

Post by joescoolcustoms »

Did you consider adding baffles inside the tank?
I did Vincent, but checked the fuel level float mechanism and they would have interfered with the movement.

When I did the tank for the my Puzzle Manx, which was full tube chassis, I was able to add baffles to it because it was much deeper and wider.
User avatar
joescoolcustoms
Posts: 286
Joined: Mon Jun 03, 2013 5:00 am
Location: Saint Albans, WV

Re: First Build thread of 2015 and of the new Forum - Lorett

Post by joescoolcustoms »

Loretta now has a Butt on her. Finished the fuel tank modifications so I could put away the shear and bolt up the tubing bender. Since I am also building a B&N Fiberglass Viper, I just went ahead and made two bumper sets of tubing. The Viper is on a stock pan and will not get any lift, so, it's set is smaller. Loretta is lifted and needs a taller bumper to make the proportions look correct.

895

894

I am old skool, manual bender.

898

For a good bumper to actually work, it needs strong mounts. And since I install hitch receivers in the bumpers, it has to have a strong mount to hold up, not flex and carry the load.

The lower mount is very basic, 1/4 inch plate steel with a inner tubing sleeve welded on so the exterior tube will get a quick release pin drilled through and installed. This lower mount will get a short tab that extends forward to the skid pan mount for extra strength.

909

910
The upper mounts are also simple. 1 5/8 DOM 0.120 wall tube bent and welded onto the body mount flat ahead of the top shock mount. Additional bracing will get installed once the roll cage is completed and a Kaffer Brace is designed. The top mount is also sleeve so the bumper just slides over it and will also be pinned for quick release.

911

905

904

Some test fitting, stand back, look at it again, go inside, make a sandwich, eat, come back and look at it again. Once it is done, it is final, so better be sure what you want the first time. I thought it would be a touch too long, and it was, so it got trimmed off 2 3/4" to pull it in a little tighter to the body/engine. A Manx Sidewinder will fit later down the road as Brian updates the package. (They are never REALLY "done").

896

897

Because I mount the license plate to the bumper, I create a passage for the wiring to run through the tube in a hidden fashion so it is concealed and protected. Each side of the tubing is cut, then smoothed so the wiring does not get cut/short out.

899

900

Then it gets welded up. Hitch installed in the bottom tube.

906

902

903

I have really used the hitch on my Puzzle Manx and it has worked out very well. I use it for carrying a basket on the back. Last fall, we drove the Puzzle Manx to the OBX in NC for MOTB '14. I used the rear basket and hauled about 175 pounds on it. Could not even tell it was on the buggy. Even if Brian does not use the hitch, it does make a cool spot to put in a hitch cover, with maybe a Manx emblem on it???????

908

907
User avatar
abgiles
Posts: 226
Joined: Thu Jan 01, 1970 1:00 am
Location: Yulee, FL

Re: First Build thread of 2015 and of the new Forum - Lorett

Post by abgiles »

joescoolcustoms wrote:Even if Brian does not use the hitch, it does make a cool spot to put in a hitch cover, with maybe a Manx emblem on it???????
Hmmm.... Now you've really got me thinking Joe! I will be using the hitch for a basket, but not all the time. I was wondering which of the emblems I was going to use, and now I believe I'll be using them both.

Loretta's butt has never looked better! Some junk in the trunk is just what she needed!
(Loretta) Manx # M2940D910E on customized 1970 chassis that has been "Wheelerized" by Joescoolcustoms
(Scarlett) Manx Resorter #12 (R0012B931S) on 1969 chassis.
(Gunther) Manx 2 # A0202A035E
Tow'dster # TF530G913S
Original Home built buggy that I learned to drive in back in 1995 (the one that started my passion).
Club Member # 4436

Loretta: http://www.manxclub.com/forum/viewtopic ... t=3365Manx" onclick="window.open(this.href);return false;
User avatar
joescoolcustoms
Posts: 286
Joined: Mon Jun 03, 2013 5:00 am
Location: Saint Albans, WV

Re: First Build thread of 2015 and of the new Forum - Lorett

Post by joescoolcustoms »

A "special" emblem back there as a hitch plug would be different!

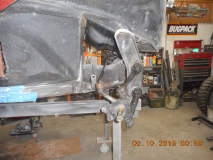
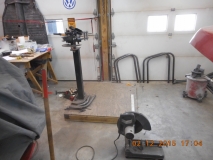
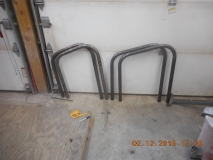
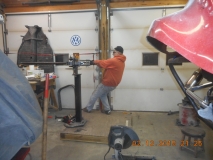
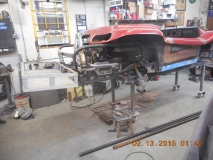
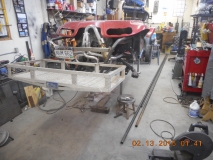
More fabrication tasks getting done. And I finished up when it was still daylight!!

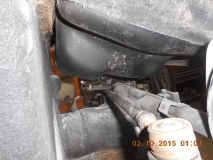
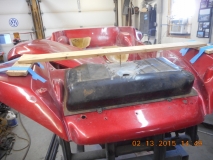
How do you located a fuel filler in a tank, and not butcher a hood getting access to it? It is much easier if you are starting from scratch.

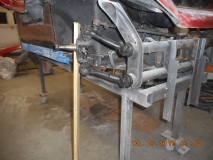
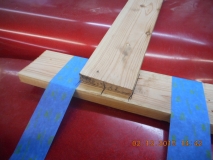
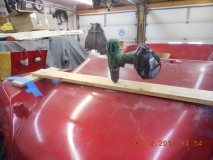
I set up a simple "poor boy" jig to locate the filler. It is nothing more than a board with a hole in it. I did go all technical and drill the hole with the drill press to get it straight.

917

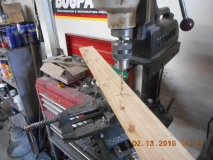
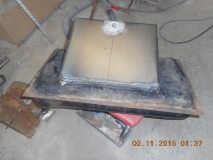
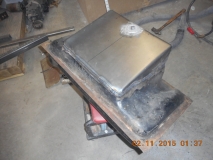
Then place an shim the board on the fenders so it can be relocated when the hood is off. Note that the board does not touch the hood so it is independent of the hood positioning. The board is also marked so it can be removed and set back in the same spot each time the hood is removed/installed. I even shaved/tapered the board ends so it would lay parallel with the hood to locate the filler perpendicular to the hood and allow the filler cap to lay evenly on the hood.

916

914

915

913

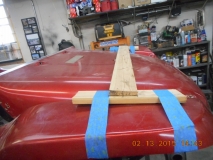
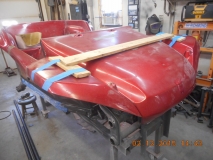
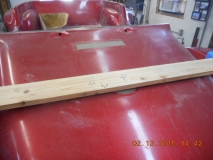
Measure, measure, measure then measure again to properly position the exact location of the new filler riser. This will be transferred to the hood to drill the hood.

918

919

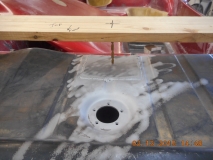
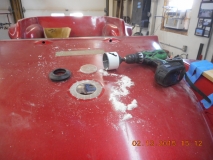
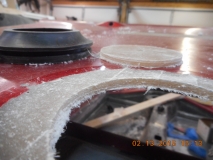
Put the hood back on and drill the pilot hole.

920

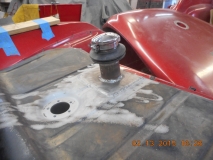
Drill the 3 inch diameter hole. This is larger than the 2 inch filler tube to allow for the seal gromet. The Gromet is for a '71 - '72 chevy pickup fuel tank filler.

921

Cool!!! Hit my mark almost dead on.

922

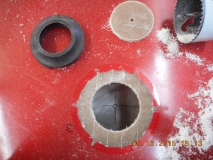
Now is a good time to check my fiberglass skills. Since this hole goes right through the formerly repaired hole, it will show if I am not getting good lamination, too much resin, or not enough resin. Looks really good and I am pleased. Polish the rough edge with some 80 grit paper so it wil not cut the rubber gromet and it is ready to go.

923

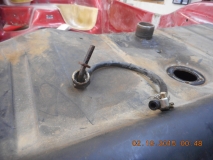
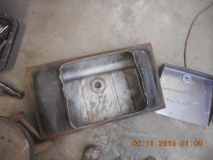
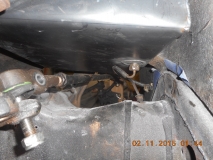
Position the filler riser tube and weld it in place.

925

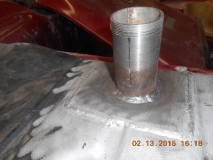
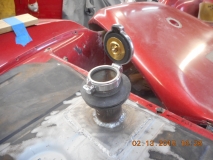
Drill the interior of the riser tube.

926

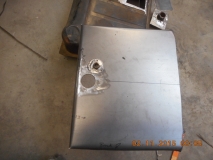
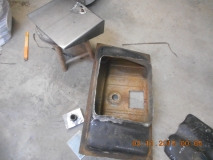
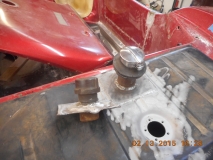
Looks good and the tank is now finished and ready for the interior coating to seal any pin holes and guard against rust. Also check out the cut plug, hit the bulls eye!

927

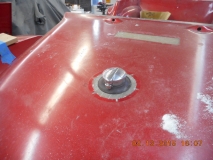
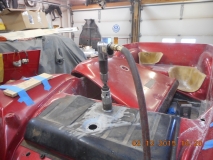
Done. The flip top is a motorcycle BSA, Norton fuel filler flip cap that is also vented. So, no extra vent needed and no interior gas fumes making your Honey sick.

928

929

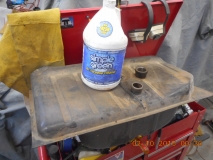
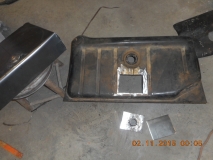
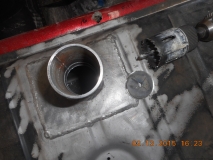
Here is what it replaced. A pipe with a pipe cap. The cap did have a vent hole drilled in the top. But also note that it stuck down into the tank. That limits to filling capacity. Welded on top, then drilled gets the maximum capacity for Brian's long trips. The 14 gauges metal patch welded on the top of the tank spreads the load and makes the filler really sturdy from flexing.

930


Nice, discrete and simple filler.

924
User avatar
manxvair
Posts: 744
Joined: Tue Mar 30, 2010 5:00 am
Location: Mohave Valley, AZ

Re: First Build thread of 2015 and of the new Forum - Lorett

Post by manxvair »

Damn your good! That was an awesome write and example.
Mike Dario
Mohave Valley, AZ
Manx Club #957
Manx Club President

Tow'd (Hers)
Manxvair (His)
Manxter Dual Sport #30 Baja Edition #2 (Ours)
Resorter #19-Fuscia(under construction)
Post Reply