First Build thread of 2015 and of the new Forum - Loretta

How-to building, restoration, repairs, and fun with your authentic Manx!
Post Reply
User avatar
joescoolcustoms
Posts: 286
Joined: Mon Jun 03, 2013 5:00 am
Location: Saint Albans, WV

Re: First Build thread of 2015 and of the new Forum - Lorett

Post by joescoolcustoms »

bhdeloach wrote:Joe, that's one awesome job you are doing! You do need to sync your camera time though, LOL.
Thank you!

The time will sync back up here in another month and a half. Too lazy to figure it out.
bhdeloach
Posts: 2
Joined: Thu Jan 29, 2015 3:21 am
Location: Ludowici, GA

Re: First Build thread of 2015 and of the new Forum - Lorett

Post by bhdeloach »

I don't think lazy is in your vocabulary! I look for your updates like a mini series on television. Can't wait to see the rest. I definitely have a tutorial to go by now for mine. Is the pan welded just to the outside frame or did you weld a lip on the outside for it to lay on then weld up? Looking like it's just welded to the edge. Is the front and rear 2 inches higher too?
User avatar
joescoolcustoms
Posts: 286
Joined: Mon Jun 03, 2013 5:00 am
Location: Saint Albans, WV

Re: First Build thread of 2015 and of the new Forum - Lorett

Post by joescoolcustoms »

Ha Ha! Depends on who you talk to on the Lazy thing.

The floor is welded direct to the side rails. I have done my last two buggy's this way and they have been super strong, do not rattle or flex when stepped on.

The chassis now has a built in 2 inch lift all around. This was done so the re-built battery and tire well will clear the suspension. The body is going to be restored very close to original, but will have a custom chassis under it.
User avatar
abgiles
Posts: 226
Joined: Thu Jan 01, 1970 1:00 am
Location: Yulee, FL

Re: First Build thread of 2015 and of the new Forum - Lorett

Post by abgiles »

Love the updates Joe! Amazing job so far, and I'm sure the rest will be just as incredible! The only regret that I have is that I can't be there to witness/learn every step of the way. I've owned a number of fiberglass buggies in the past, but now that I know the history of the Manx, I'm even more excited that Loretta's being done the right way. I can't thank you enough for taking this on for me.
(Loretta) Manx # M2940D910E on customized 1970 chassis that has been "Wheelerized" by Joescoolcustoms
(Scarlett) Manx Resorter #12 (R0012B931S) on 1969 chassis.
(Gunther) Manx 2 # A0202A035E
Tow'dster # TF530G913S
Original Home built buggy that I learned to drive in back in 1995 (the one that started my passion).
Club Member # 4436

Loretta: http://www.manxclub.com/forum/viewtopic ... t=3365Manx" onclick="window.open(this.href);return false;
User avatar
abgiles
Posts: 226
Joined: Thu Jan 01, 1970 1:00 am
Location: Yulee, FL

Re: First Build thread of 2015 and of the new Forum - Lorett

Post by abgiles »

As Joe starts playing Itchy and Scratchy, I've neglected to get some things done on my end that I had planned to do. I had big plans to have the motor apart, checked out, and back together, but family matters and helping a very close friend out the last few weekends has put a damper on that. I've finally got back in the groove of it though.

Another obstacle is the purchase of what I hope to be little bit of a money maker on my part. I found this 1971 Super Beetle at a good price, and am in the process of cleaning and tuning her up. I'm hoping to make some money on her to help offset the purchase of more parts for Loretta.

One of the guys that I'm fairly good friends with jokes that I've got more money than brains, but I promise you that I have a lot less disposable income than many of you. What I've done to get to this point is sell my other toy (my sandrail), and flip a couple of others (ghia and another fiberglass buggy). Honestly, that's the only way I can afford to give Loretta the build she deserves. Like others, I'll be paying for her for a while after she's done.

638
(Loretta) Manx # M2940D910E on customized 1970 chassis that has been "Wheelerized" by Joescoolcustoms
(Scarlett) Manx Resorter #12 (R0012B931S) on 1969 chassis.
(Gunther) Manx 2 # A0202A035E
Tow'dster # TF530G913S
Original Home built buggy that I learned to drive in back in 1995 (the one that started my passion).
Club Member # 4436

Loretta: http://www.manxclub.com/forum/viewtopic ... t=3365Manx" onclick="window.open(this.href);return false;
User avatar
abgiles
Posts: 226
Joined: Thu Jan 01, 1970 1:00 am
Location: Yulee, FL

Re: First Build thread of 2015 and of the new Forum - Lorett

Post by abgiles »

I also just heard from the transmission guy. He's got it apart, and is cleaning now. We're working on gear ratios, and hope to have it solidified in the next day or two. I do know he's putting in a super diff, steel shift forks, aluminum side plates, and welded gears. About the largest motor I'd be running in her would be an 1835, and most of my driving will be in relatively flat areas.

I'm amazed at the number of questions he's asked about how I'll use her.

If anyone needs a transmission built, Jeff Huber at the Gear Garage (pictures of his place are in one of my earlier posts) certainly seems to be knowledgeable, and has a ton of experience with VW's. He's also a sponsor of Manx on the Banx!

He's also understanding that not everyone has an unlimited budget, and will help you figure out what's best for your build. In my case, he's got a very gently used superdiff that he's giving me for half price, used aluminum side plates in very good condition for less than 1/2 price, etc...

http://geargaragenc.com/
(Loretta) Manx # M2940D910E on customized 1970 chassis that has been "Wheelerized" by Joescoolcustoms
(Scarlett) Manx Resorter #12 (R0012B931S) on 1969 chassis.
(Gunther) Manx 2 # A0202A035E
Tow'dster # TF530G913S
Original Home built buggy that I learned to drive in back in 1995 (the one that started my passion).
Club Member # 4436

Loretta: http://www.manxclub.com/forum/viewtopic ... t=3365Manx" onclick="window.open(this.href);return false;
langan
Posts: 242
Joined: Sun Mar 09, 2014 6:00 am
Location: Eagle ID.

Re: First Build thread of 2015 and of the new Forum - Lorett

Post by langan »

Hi Joe
Nice build love the seats
User avatar
joescoolcustoms
Posts: 286
Joined: Mon Jun 03, 2013 5:00 am
Location: Saint Albans, WV

Re: First Build thread of 2015 and of the new Forum - Lorett

Post by joescoolcustoms »

JJLangan wrote:Hi Joe
Nice build love the seats
Thank you!

I put a set of them in a Sears Rascal I built in 2014 and really liked the seating position and comfort.
langan
Posts: 242
Joined: Sun Mar 09, 2014 6:00 am
Location: Eagle ID.

Re: First Build thread of 2015 and of the new Forum - Lorett

Post by langan »

I tried to find for my Locost 7 never did find any. Nice to know they worked so good for you. The fun is in the hunt.
User avatar
joescoolcustoms
Posts: 286
Joined: Mon Jun 03, 2013 5:00 am
Location: Saint Albans, WV

Re: First Build thread of 2015 and of the new Forum - Lorett

Post by joescoolcustoms »

I rushed home from work today to make the best of a gift, a 50* F day that was not raining. I think during the winter in West Virginia, the only sunny day we get that is not overcast and grey is Groundhog Day. But, dry and decently warm is welcomed.

A couple days ago I pulled the "doors" out of the body. Aluminum rivets into aluminum strapping did a nice repair, but this will be a permanent fix.

656

657

658

Since Loretta is being mated to a new chassis, the body is firmly bolted to the new chassis for the fitting of the doors so they will line up to the twist/sag imposed by the new chassis. 1/4 inch thick X 2 inch wide steel strapping is used and the "sandwich" material to capture the body to the chassis. It is also the base plate for the roll cage.

647

Itch-Fest 2015 has now begun. Fully dressed out, respirator, gloves and ready for the glass grinding. All the edges need dressing before fiberglassing items together If not, the glass will not properly bond to the existing body.

648

649

I have been told and have read that a taper needs to be made down to a knife edge at 10 times the thickness of the the material. The body is about 1/8 inch think in these side areas, so, 10 X 1/8" = 1 1/4 inches wide taper area. All dirt and debris has to be removed from the glass and ground to fresh glass is exposed.

645

652

On the exposed areas above, I have not yet taken the taper all the way across the surface to be bonded. I learned on patching together the Viper body I worked on in December that leaving a little original edge will help in aligning up the panel perfectly, then after some small sections are bonded, the final areas can be ground and all area completed.

646

653

The side door panels are a little harder to hold and grind on. I flop down a small piece of scrap plywood on the ground and grind away. The plywood keeps me from gouging areas in my driveway and not scratch what finish surface that is left on the panel.

650

651

The hood also has two large holes to patch, so.....

654

Ready to roll back in the garage and start fitting the panels for the glass work.

655
User avatar
abgiles
Posts: 226
Joined: Thu Jan 01, 1970 1:00 am
Location: Yulee, FL

Re: First Build thread of 2015 and of the new Forum - Lorett

Post by abgiles »

joescoolcustoms wrote: The hood also has two large holes to patch, so.....

654

There goes my air condition... I do have the honor of saying Bruce told me the that vent in the hood was probably the most ridiculous thing he had ever seen on a Manx. "Why would they do that? Were they not getting enough air already?"
Last edited by abgiles on Fri Feb 06, 2015 1:09 pm, edited 1 time in total.
(Loretta) Manx # M2940D910E on customized 1970 chassis that has been "Wheelerized" by Joescoolcustoms
(Scarlett) Manx Resorter #12 (R0012B931S) on 1969 chassis.
(Gunther) Manx 2 # A0202A035E
Tow'dster # TF530G913S
Original Home built buggy that I learned to drive in back in 1995 (the one that started my passion).
Club Member # 4436

Loretta: http://www.manxclub.com/forum/viewtopic ... t=3365Manx" onclick="window.open(this.href);return false;
YumaManx
Posts: 32
Joined: Tue May 10, 2011 5:00 am
Location: Lodi, Ca

Re: First Build thread of 2015 and of the new Forum - Lorett

Post by YumaManx »

Great thread!
User avatar
abgiles
Posts: 226
Joined: Thu Jan 01, 1970 1:00 am
Location: Yulee, FL

Re: First Build thread of 2015 and of the new Forum - Lorett

Post by abgiles »

YumaManx wrote:Great thread!
He does do incredible work, along with great explanations!
(Loretta) Manx # M2940D910E on customized 1970 chassis that has been "Wheelerized" by Joescoolcustoms
(Scarlett) Manx Resorter #12 (R0012B931S) on 1969 chassis.
(Gunther) Manx 2 # A0202A035E
Tow'dster # TF530G913S
Original Home built buggy that I learned to drive in back in 1995 (the one that started my passion).
Club Member # 4436

Loretta: http://www.manxclub.com/forum/viewtopic ... t=3365Manx" onclick="window.open(this.href);return false;
User avatar
joescoolcustoms
Posts: 286
Joined: Mon Jun 03, 2013 5:00 am
Location: Saint Albans, WV

Re: First Build thread of 2015 and of the new Forum - Lorett

Post by joescoolcustoms »

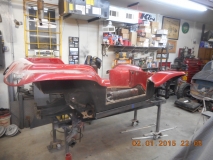
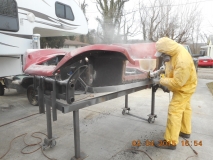
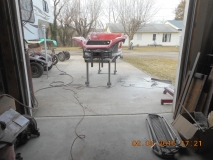
This past week has been busy. My one day per week part time job can consume too much time a couple times per year with Hazardous Waste training, physicals, respirator fit tests, writing semi-annual reports and so forth. But did get some "Glass" time in on Loretta.

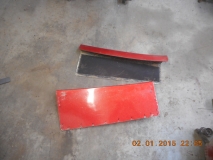
I went and bought some "Door-Be-Gone" liquid to apply to the sides of the buggy where it had been cut. I have used the Door-Be-Gone before, twice, unfortunately, and it works very well. There is another brand out there that goes by "Door-No-More", but it is not available local to me and if you can only get it, it will work just fine for you.

DISCLAIMER The techniques I show on this post are in no way the only way to do this work, or the only materials that can be used. It is the way I do the task based on advice, instruction from some very good people in this club and on this site, experience in getting messy doing it, re-doing mine and others bad repairs, reading and general experimentation. My explanation and photo's are to show you this is actually easy to do, time consuming and messy, but easy.

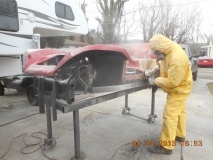
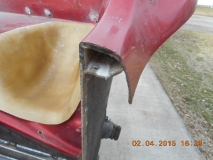
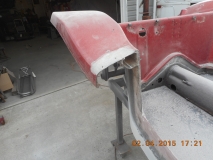
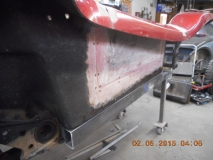
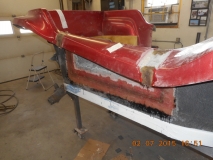
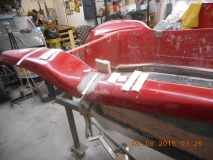
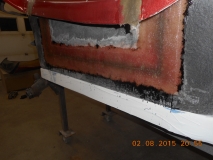
First is to properly position the doors and hold them tightly and steady so once the fiberglass, (FG) and resin cures, it will be in the exact position you need it to be. On this buggy, I used 1 X 4 wood that was super straight. Wrapped it in wax paper so the FG would not stick to it. The used the existing holes to screw the wood to the body on the inside. Using the inside is important because it is the finished surface and is flat. This will hold the body and panel flat for a smooth final finish. If it was done from the outside, the roughness of the chopper gun sprayed FG may cause the interior to not be perfectly in line with one another.

765

766

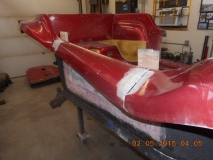
This is where those small areas I did not grind away for FG prep come in handy. Since they are still original, They can be used to line up the top, but also the side edge.

767

768

769

770

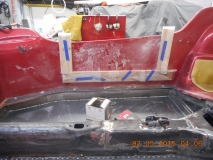
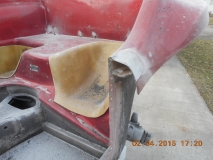
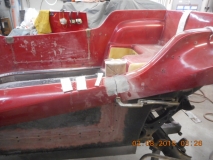
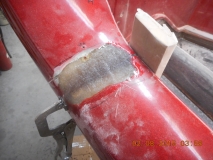
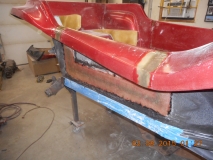
Vince S. had told me it is best not to layer in over 4 layers of FG at a time. I cannot remember why, but once you lay 4 layers in, you need to stop to let cure so it does not get sloppy on the repair. 4 layers of the 2 ounce mat I am using builds up to around 1/4 inch thick. Next is to lay up the areas like you are tack welding in a piece of metal, and not cover the screw heads. (It makes it a LOT easier to remove the screws later!!!).

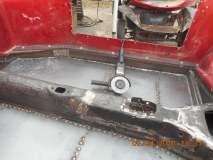
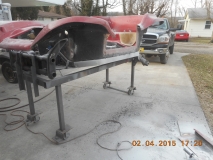
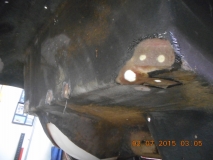
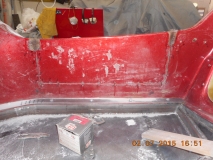
Note the screw I used to pry the panel slightly to help alignment of the panel. And the vice grip to hold the lower lip in line with the body lip.

771

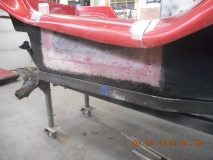
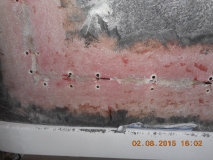
It can be seen where I glassed in small pieces of FG between the screw heads.

772

773

774

775

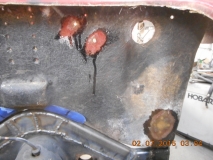
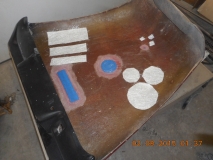
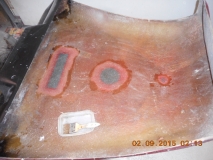
Since I am cheap, I do not like to waste anything. Darlene calls me a pack rat and a David's wife calls me Sanford. So, I do not like to waste mixed resin. I try to use every bit I mix. It is not as cheap as it once was. So, when I get ready to lay up a area, I try to prep some other small areas in the event I mix too much resin, I can go to the small areas and "spend" the rest of the mixed material. It has to get fixed anyway. So, there were some big holes in the rear of the package trey and a few up front including the dimmer switch holes.

Some times I only get one of two layers on it, but it is there if I have extra later on another lay up session.

776

777

778

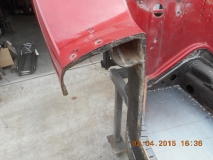
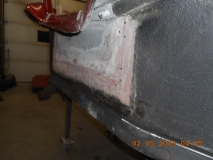
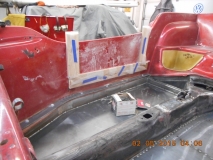
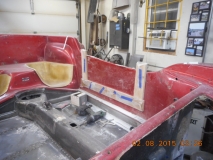
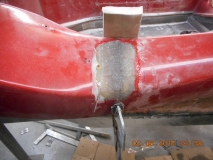
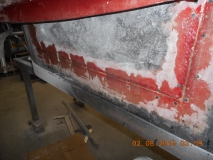
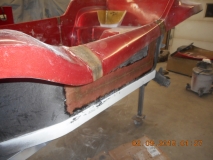
Now that the "tacking" in place of the panel has cured, the screws come out, the boards off, then the remaining areas ground for FG prep. Then lay in more layers to build up the repair from the knife edge to the top surface. Some times this takes a few applications to get it where you want it.

779

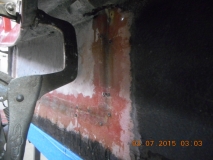
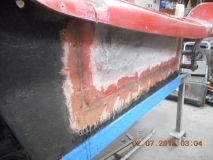
Other than the top area which cannot be accessed from underneath due to the "tubes", there is just a fine line to repair in the inside. This helps lessen the amount of finish body work needed on the inside. It will get ground out and about a 3/8 inch wide seam will get filled with resin mixed with Cabosil, (more on Cabosil later) for a smooth inner surface.

780

Repeat for the other side. Chris L. recommended to me not to try and do two large repairs at the same time. Focus on one, get it done, then go to the other. It will be easier on you and makes less mess.

781

I highly recommend having a "cutting" table where you can get away from the sticky repair and prep the materials for the lay up session. If you are dong a large repair like I am on Loretta, get some Acetone to help clean up the messy resin, off your hands, arm hair, tools, bench, dash, body and other areas it just gets on. If you are only doing small work, paint thinner will work, but will take a little more work to dissolve it away. Paper towels, ruler, scissors, mixing stick, gloves and other simple items.

785

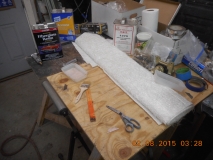
I like to cut up the glass material and have ready for once the resin is mixed so it is just production when the time comes. A small stand to place some on is also handy.

782

783

784

And again, clamped and screwed into proper position and FG layed down.
786

787

788

789

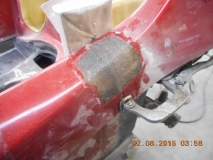
Again, initial lay up cured, screws and boards removed and ready for grinding and additional lay up.

790

791

After a lay up cures, and before laying another layer on, I sand the cured areas. This not only gives a "fresh" surface to lay on removing wax and any contaminate, but also rough areas that stick up along the edges that will hold up a second layer from properly laying down flat.

792

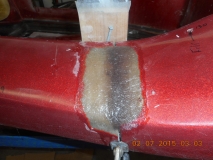
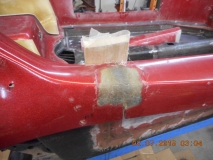
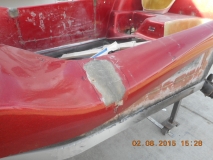
Here you can see a low spot on the side edge. Do not be tempted to use body filler to take care of this. It is not a "Bondo Buggy", it is a Fiberglass Buggy, use additional fiberglass to fill the area.

793

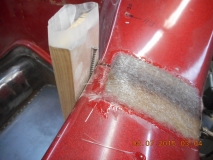
Prepped and ready to lay in the next layer on the drivers side.

794

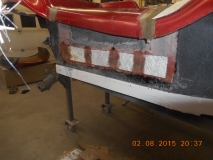
When the panels are prepped, remember they are ground on a taper from full thickness to a knife point edge. When it is layered back on, you start out with thin strips, then a little wide strip, then wider to reverse taper lay in the glass. Here is coming up on one of the final layers on the sides.

795

Wetting it in.

796

797

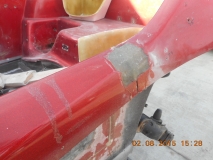
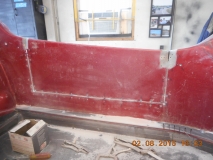
Basically the doors are done. They do need the very thin top worked to get it super close for primer, which will also be polyester Slick Sand. I like using "like" materials so all expansion/contraction during heating and cooling cycles is the same and reduces the chance of the repair shadowing under the paint.

The Door-Be-Gone has worked again.

798

799

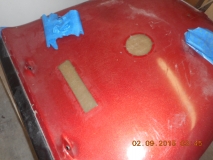
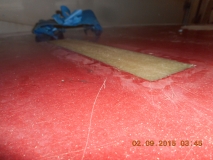
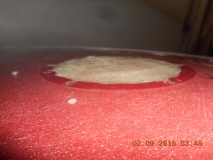
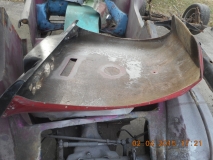
Next up is the hood. For some areas, I use masking tape as my mold backing if the surface is flat, or very close to flat.

800

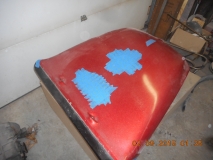
Here you can see how I cut the mat to lay up. Start out with the first layer almost the exact size of the hole to be filled, then slightly bigger, and again bigger. This is the reverse taper to fill the repair area evenly and have a consistent repair.

801

And laid in. What is not shown is some extensive repair up inside of the hood/dash meeting area on the sides of the hood. There was several holes drilled to mount the windshield, and all in the wrong position at the wrong angle.

802

Once the tape is removed, a nice repair is left with little final finish work needed to make it ready for paint.

803

804

805
TSFR
Posts: 45
Joined: Mon Jan 12, 2015 11:55 pm
Location: Columbia, SC USA

Re: First Build thread of 2015 and of the new Forum - Lorett

Post by TSFR »

As always...NICE Work! I have a question about what appears to be (may not be) spider cracks in the hood. How do you fix those and is it from flex or the fiberglass drying out? Thanks for the awesome lesson Joe!
Thanks,
Jeff TSFR
Post Reply